
SAML with ADFS
Discover how Pleasant Password Server will enhance KeePass for business
The following steps can be used to setup an configure SAML SSO, with ADFS (Active Directory Federated Services). Other providers can be used with SAML SSO as well, see the related links below.
This can use your existing AD/LDAP connection and allow these users to be authenticated once using LDAP credentials and not be prompted again if they are already signed in.
Applies to: Versions 7.9.9+, Enterprise+SSO
Related:
Initial ADFS Setup:
Use the reference link below to set up an ADFS environment:
Requirements:
An environment with 2 machines:
- A server acting as:
- Domain Controller (DC), Directory Name Service (DNS), and Active Directory Federation Services (ADFS) server
- A server acting as:
- the Service Provider (or Relying Party)
- with Pleasant Password Server installed
Setup Overview - Configure SAML SSO for ADFS
- Create a Group Managed Service Account (GMSA) for use by ADFS
- Create and install a certificate (3rd-Party / Self-Signed) for ADFS to use
- Install the ADFS server role
- Configure ADFS with the certificate and GMSA previously created
- Add DNS records
Part 1 - Enable SAML in Password Server
Activate External Authentication:
- Go to the configuration page:
- Users & Roles > Authentication Services
- Click Add SAML Configuration
- Provide an Issuer Name value
- This value identifies your Pleasant Password Server application to the Identity Provider (ADFS), for example:
- https://fs.mydomain.com/adfs/services/trust
- Alternatively, some providers may allow this:
- Pleasant Password Server
- This value will be needed during step 2
-

- This value identifies your Pleasant Password Server application to the Identity Provider (ADFS), for example:
- Adjust the SSO Session Lifetime
- If using Single Log Out (SLO), this value should be increased so the the session data is kept longer
- However, if users are signing out often, i.e. daily, this value does not need to be larger
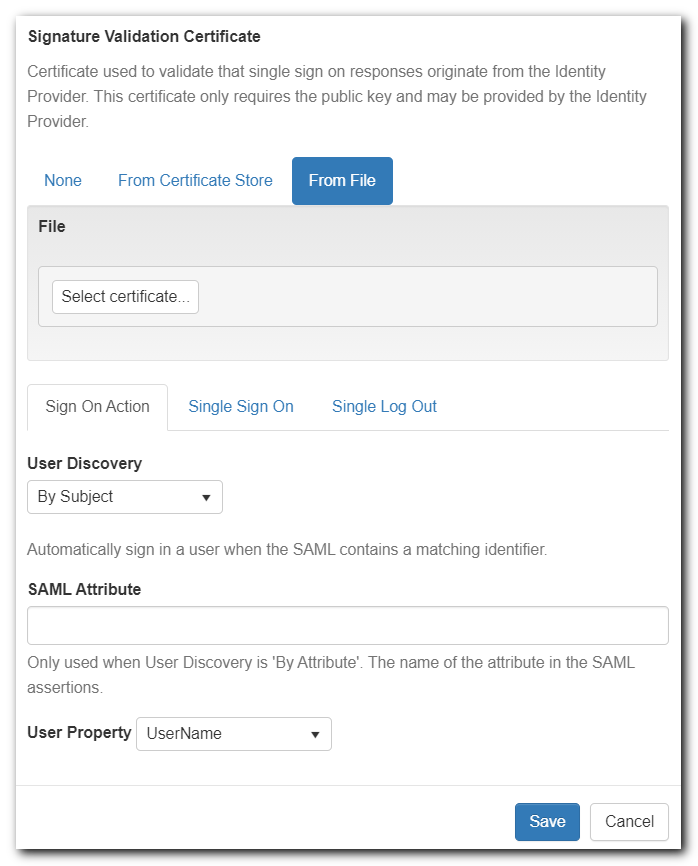
- (optional) Provide a certificate for digitally signing SAML requests and responses
- Single Log Out (SLO) on ADFS requires that the requests be signed
- See the addendum sections below for instructions on creating and configuring a signing certificate
- Note: only .pfx or .p12 formats are accepted currently. Use the steps mentioned here to convert (Option A, step 2).
- This certificate can be a self-signed certificate for ADFS
- Be sure that your IIS user account (or AppPool) has read permissions to the imported certificate
- Save the configuration
- Another screen will show the SAML Configuration values:
- For example:
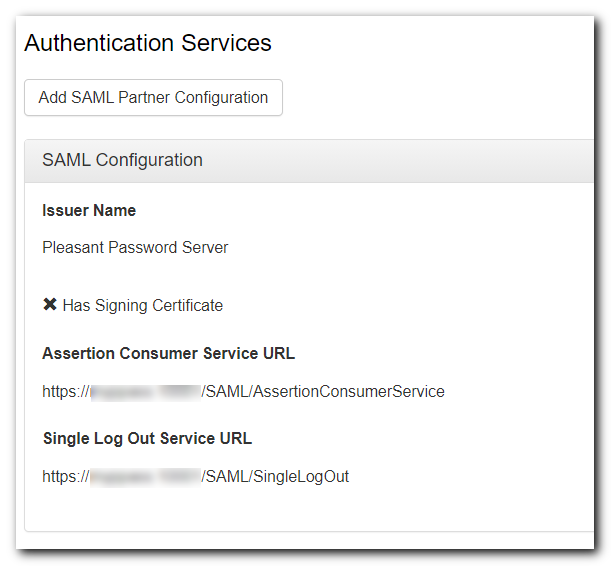
- Save the values for:
- Issuer Name, Assertion Consumer Service URL, and Single Log Out Service URL
- If using a certificate for signing you will also need to export the public key
- If the URLs are directed to localhost, but this is not the URL you intend to use then you should sign in via that URL first
Part 2 - Configure ADFS
- Open Administrative Tools
- Open AD FS Management
- Select Trust Relationships > Relying Party Trusts
- In the actions pane, select Add Relying Party Trust...
- AD FS refers to the application as a Relying Party, which is synonymous with Service Provider
- In Welcome click Start
- In the actions pane, select Add Relying Party Trust...
- In Select Data Source
- Select Enter data about my relying party manually
- Click Next
- In Specify Display Name
- Enter a name for the application like Pleasant Password Server
- Click Next
- In Choose Profile
- Select AD FS Profile (first option)
- Click Next
- In Configure Certificate
- (optional) Select the public key from a certificate to be used to encrypt the SAML claims
- This can be a self-signed certificate, and may be the same certificate that will be used for verifying signatures
- Click Next
- (optional) Select the public key from a certificate to be used to encrypt the SAML claims
- In Configure URL
- Check Enable support for the SAML 2.0 WebSSO protocol
- Enter the Assertion Consumer Service URL you noted earlier
- Click Next
- In Configure Identifiers
- Enter the Issuer Name value you noted earlier, example,
- Pleasant Password Server
- Alternatively, it may be best specified in this format:
- https://sub.mydomain.com/adfs/services/trust
- Click Add
- Click Next
- Enter the Issuer Name value you noted earlier, example,
- In Configure Multi-factor Authentication Now?
- Configuring multi-factor authentication for AD FS is beyond the scope of this document
- For more information on multi-factor authentication for AD FS see:
- Select I do not want to configure multi-factor authentication settings for this relying party trust at this time
- Click Next
- In Choose Issuance Authorization Rules
- Select Permit all users to access this relying party
- Specific access rules can be added later, if desired
- Click Next
- In Ready to Add Trust
- This page provides a summary of the configuration for your review
- Click Next
- In Finish
- Ensure that Open the Edit Claim Rules dialog for this relying party trust when the wizard closes is checked
- Click Close
- In Edit Claim Rules: Issuance Transform Rules tab
- Click Add Rule...
- In the Select Rule Template
- Select Send LDAP Attributes as Claims and click Next
- In the Configure Claim Rule
- Enter Account Name as the Claim rule name
- Select Active Directory as the Attribute store
- Select SAM-Account-Name as the LDAP Attribute
- Select Name ID as the Outgoing Claim Type
- Click Finish to add the rule and close the wizard
- Click OK to close the Edit Claim Rules dialog
- (optional) Configure Single Log Out (SLO)
- Double-click your relying party trust to open the properties dialog
- Select the Signature tab
- Click Add and select the public key certificate that you exported for signing in Part 1
- Select the Endpoints tab
- Click Add SAML...
- Select SAML Logout for Endpoint type
- Select POST for Binding
- Enter the value of Single Log Out Service URL noted above for Trusted URL and Response URL
- Click OK to add the endpoint
- Click OK to close the properties dialog
Part 3 - Export ADFS Certificate
- Open Administrative Tools
- Open AD FS Management and navigate in the sidebar to AD FS > Service > Certificates
- Double click on the certificate under Token-signing
- On the Certificate screen click Details tab
- Click Copy to File..., then OK
- In the Certificate Export Wizard:
- Click Next > Select Base-64 encoded X.509 (.CER)
- Click Next
- Select Browse to select the certificate location, and type the filename, and click Save
- In the Completing the Certificate Export Wizard:
- Click Finish, then OK
Part 4 - Configure Password Server to Connect to ADFS
- Go to the Authentication Services configuration page
- Click Add SAML Partner Configuration
- Enter the following value in Name (Note: that this is 'http' NOT 'https')
- Replace fs.mydomain.com with the fully qualified domain name of the ADFS server, with the value shown in your ADFS:
-
Notes:
-
This is 'http' NOT 'https'
-
This is just a name value which will be compared, not actually a URL used for communication.
-
If the values do not match, the server logs will show a Key not found error.
- http://fs.mydomain.com/adfs/services/trust

-
- Replace fs.mydomain.com with the fully qualified domain name of the ADFS server, with the value shown in your ADFS:
- Enter a value for Friendly Name
- This will appear in on the Sign-In page
- Upload the ADFS Certificate, from Part 3
- Leave the Sign On Action configuration as-is
- Select the Single Sign On tab
- Enter the following value in Service URL
- Replace fs.mydomain.com with the fully qualified domain name of the ADFS server:
- https://fs.mydomain.com/adfs/ls
- Replace fs.mydomain.com with the fully qualified domain name of the ADFS server:
- Select Post as the Binding Method
- (optional) Select Sign Authentication Request if you have configured a signing certificate during Part 1
- (optional) If you configured a certificate for encryption during the AD FS setup then you must configure the Assertion Decryption Certificate
- This must be same certificate with the private key
- See addendum sections below for configuring a certificate
- (optional) Select the Single Log Out

- You must have followed the optional steps in parts 1 and 2 to configure Single Log Out
- Enter the same value for Service URL as you did for Single Sign On
- Leave Service Response URL blank
- Select Post as the Binding Method
- Check both Sign Log Out Request and Sign Log Out Response
- Click Save

Part 5 - Restrict SSO Login (Optional)
- Option to restrict sign-in with your trusted Identity Provider, and only allow sign-in locally in the case of emergencies by admins:
Part 6 - Signing In
- Users imported from the same Active Directory that AD FS is using will automatically be able to sign-in via AD FS
- Users MUST be manually imported OR manually sign-in to Password Server if auto-import is enabled before AD FS sign-in is possible
- If not importing users, the username must match the value of the SAM Account Name that AD FS is using
- Users may still sign-in locally instead of using AD FS
- If Single Log Out was configured, then signing out of Password Server will also sign the user out of AD FS (and other AD FS sessions)
- To sign in or out of Password Server and other applications configured to use AD FS, use this page:
- https://fs.mydomain.com/adfs/ls/IdPInitiatedSignon.aspx
Troubleshooting